Sunday, December 30, 2012

Lobster and Brie Dip

My family came to visit me for Christmas (YAY!) and it was awesome.  The next series of food posts will focus on all the meals I fed them, and believe me, I made a LOT of food - but that's why I love for my family to come visit.  I get to cook!  And I have so many untested recipes in my Binder-o-Recipes, that I love being able to "knock a few out" :)

I had seen this recipe on Pinterest (god bless / hate Pinterest!), which promised to be a low cal dip made with lobster and brie - just the thought of brie and low-cal together made it seem too good to be true, and made me wonder how it would taste, so I figured I'd make my family the guinea pigs :)

I had the grocery store cook a full lobster for me, so all I had to do was get the meat out.  I don't have any seafood utensils, but I do have a tool box, which is just as handy: 


This recipe also calls for 6 cups of baby spinach, sauteed with garlic.  Oooooh it was GOOD...


After slightly wilting the spinach, you put it in the colander and drain as much of the excess water as possible...

Beautiful brie cheese....

Combine spinach, chopped lobster meat....


With a cream cheese/greek yogurt/brie mixture...

Then bake, and SERVE!  Easy, cheesy :)

It was good.  The garlic-sauteed spinach added so much flavor.  To be honest, I didn't really notice the lobster that much, sigh.  Good lobster should not be wasted. But regardless, it was DELISH.  And, my family seemed to enjoy it (maybe they were just humouring me, you never know!)

I served it with Wheat Thins and Triscuits (variety, people!), but any good cracker, or perhaps some whole wheat crostini, would be fine.

Continue reading for the full recipe, or click here for a printable version.

Lobster & Brie Dip

INGREDIENTS:

  • 2 tsp olive oil
  • 2 cloves garlic, minced
  • 6 cups baby spinach, lightly packed
  • 1 cup shredded part-skim mozzarella cheese
  • 1/2 cup nonfat plain Greek yogurt
  • 1/2 cup low-fat plain cream cheese, softened
  • 1 tbsp fresh lemon juice
  • Pinch ground cayenne pepper
  • 1 1/2 cups chopped cooked lobster meat
  • 1 1/2 cups low-fat Brie cheese, diced (about 7 oz)
  • 2 tbsp each chopped fresh chives and flat-leaf parsley
  • Sea salt and fresh ground pepper, to taste

INSTRUCTIONS:

  1. Preheat oven to 375°F. In a large skillet, heat oil on medium-high. Cooking in batches if necessary, add garlic and spinach and cook for 1 to 2 minutes, until spinach is just wilted. Transfer to a colander, allow to cool for 2 to 3 minutes and gently press to drain excess water. Cool to room temperature and transfer to a large mixing bowl. Set aside.
  2. Add mozzarella, yogurt, cream cheese, lemon juice and cayenne to the bowl of a food processor and pulse until thoroughly combined. Using a spatula, scrape cheese mixture into bowl with spinach. Stir in lobster, Brie, chives and parsley. Season with salt and pepper.
  3. Transfer dip to a shallow ovenproof casserole dish and place dish on a baking tray. Heat in oven for 15 to 18 minutes, until hot and bubbling. Remove from oven and let rest for 3 to 4 minutes. 
  4. ENJOY.

Monday, December 17, 2012

Random Inspiration: Pesce all' Acqua Pazza

Do you ever go to the grocery store and see a seasonal, beautiful ingredient, like a carton of fresh California Mission Figs, or a stunning piece of fish? Do you think "Wow, if only I had a recipe to use that gorgeous ingredient in..." and move on without placing said gorgeous item in your shopping cart?  Yeah, I do that all the time, cause I'm a planner.

Except, a few weeks ago, I was NOT me, and I blame it on a stunning fillet of halibut.  It was just sitting in the case at the seafood counter, and it was thick, and white and PRETTY and I JUST HAD TO HAVE IT.  So I bought it.  No plan for how I was going to make it.  Just boom.  And there I was, a proud owner of a beautiful piece of fish, and I needed to do it justice.

Immediately upon arriving home with this piece of fish in tow, I consulted my trusty binder full of recipes (ala Binders full of women).  I flipped to the seafood section (yes, I organize my binder of recipes into categories... I know, I'm a nerd), and I found this recipe from Shape magazine for Pesce all' Acqua Pazza: 


It's actually a recipe from Teresa Giudice's (she's one of the "Real Housewives of New Jersey") cookbook, and apparently Pesce all' Acqua Pazza means "Fish in Crazy Water," which is pretty perfect considering that Teresa is CRAY CRAY, and also... I had just "survived" Sandy, where I experienced CRAZY amounts of water outside my front door, and in fact, inside my front door. (I was never in any personal danger, but it was a surreal experience, and I am, in fact, a survivor, right?!?) 

It was like destiny.  Except, I didn't have any of the other ingredients handy.  (This is why I'm a planner, people!!)

So I made a second trip to the grocery store (thank goodness it's a short half mile walk away), and picked up the remaining ingredients.  But forgot THE MOST important one... a bottle of dry white wine.

Which, at the end of the day is not a problem considering I'm surrounded by at least three liquor stores within a 2 block radius... except that two of those three were still not open yet as they were still cleaning up after Sandy.  I lucked out that the only store open had a bottle of cheap dry white wine.

And then, FINALLY, after three trips for ingredients, I cooked.


And I sipped (hey, I had an open bottle of wine in front of me!):


Continue reading for the full recipe, or click here for a printable version.

Pesce all' Acqua Pazza, slightly adapted from Teresa Guidice

Serves 4, 5 minutes prep, 35 minutes cooking time

1 T olive oil
1/2 cup chopped red onion
2 garlic cloves, minced
1 pint grape tomatoes, halved lengthwise
1/2 cup dry white wine
1 lemon, juiced (Teresa calls for the full lemon, thinly sliced, but the rind made the sauce bitter, so I'm steering y'all clear)
4 4-to-6 oz skinless fillets of halibut (or Chilean sea bass fillets or cod)
1/4 t salt
1/8 t freshly ground black pepper
3 T chopped fresh Italian parsley (garnish)

1. Heat oil in large skillet over medium.  Add onion and cook, stirring often, for about 3 minutes or until softened.  Mix in garlic and cook for 1 minute or until fragrant.


2. Add 2 cups water along with the tomatoes, wine and lemon slices (only use lemon juice, trust me here!), and bring to a boil.  Reduce heat to medium-low and simmer uncovered for 10 minutes.


3. Place fish in the simmering liquid and cover; cook for about 15 minutes or until fish is opaque.  NOTE: I overcooked the fish.  A travesty, I know, so watch your fish closely and don't go away for 15 minutes.  Maybe check on it every 5 minutes or so... 

Look at this gorgeous fillet of halibut!!!  AHHH SO PRETTY


4. Using a slotted spatula, remove fillets and place one each into four bowls, then distribute the tomatoes and lemons evenly; tent each bowl with aluminum foil to keep warm.

5. Increase heat under the skillet to high.  Boil the remaining liquid, stirring often, for about 5 minutes or until reduced by half.  Season with salt and pepper. Remove the foil tents from bowls.  Pour broth evenly over fillets and sprinkle with chopped parsley.  Serve immediately.


As you can tell from my commentary, the original recipe called for lemon slices, but that turned the sauce bitter, which is a freaking shame because this recipe had SUCH potential to be SOOO FREAKING good.  Next time I make it (if I ever make it again), just do lemon juice, even though the lemon slices are pretty...)
 
What I learned from this recipe: I shouldn't feel ashamed of being a planner.  I like planning, as I feel I'm more efficient when I only have ONE trip to the grocery store instead of three... but at the same time, I was able to experience something beautiful that I might have missed had I not allowed myself to be spontaneous and go without a plan.  So... I resolve to attempt more spontaneous experiences in my cooking life... even though I know I'll be planning 99% of the time :)

Tuesday, November 13, 2012

Pork Tenderloin with Figs and Shallots

I subscribe to many fitness magazines, not necessarily for the workouts... but for the healthy recipes... that's where I get a ton of ideas on what to cook next.

The September 2012 edition of Shape magazine featured figs.  No real recipes, but mentioned how figs are healthy for you ("Rich in iron, calcium, and fiber..."), and how, since they are savory in flavor, go well with shallots and pork.

Since I had never cooked with figs, I needed some guidance, and thus googled "recipe for pork and figs".  I found this recipe, I cooked it, and it was good.

Start by browning your pork tenderloin on all sides, then transfer to oven for further cooking:


Dice up a few shallots, add to pan.  Then, quarter figs and finely chop some rosemary.


After the shallots are done caramelizing, add some balsamic vinegar and a bit of sugar...


Then, add the figs and rosemary...


Add a squeeze or three of fresh lemon:

Remove pork from oven, letting rest a few minutes, then slice...

And top with the shallot, fig and rosemary mixture...


And devour.  This was sooooo yummy.  I love caramelized onions, and combining that with the freshness of the rosemary and the sweet/savory of the fig was just an outstanding flavor combination.  One of which I highly recommend.

Unfortunately, fresh figs are only in season in late summer and early fall... so I'll add this to my "To Cook" list for next September.  You can use packaged California Mission Figs, and they cooked just nicely. Click here for this recipe!

Monday, September 10, 2012

Grilled Green Tomatoes with Corn and Pepper Salsa

I love tomatoes.  One of my fondest memories is padding barefoot through my parent's backyard in Alabama towards my Dad's garden on a hot summer day and picking a sun-warmed, ripe, red tomato off the vine, and taking a big bite.  Juiciness ensued.  Flavors exploded.  It was indescribably phenomenal.

This past week, I made a "pilgrimage" to Jersey City after work to get dinner from my favorite food truck, the Cinnamon Snail.  The Snail was parked at Grove Street, where apparently on Thursday's, there is also a farmers market.  As I was weaving my way through hipsters and women with strollers, my eye found a table of green tomatoes... and it was love.


See, I've had a recipe in my recipe book for years... and I've wanted to make it, but I couldn't find green tomatoes in my local supermarket... so when I saw them, I bought them, immediately, and never looked back.  I got home, created a shopping list for the rest of the items, and set to work!

This recipe is originally from Shape Magazine, and it's touted as being 123 calories per serving, so not only is this a yummy use of farm-fresh green tomatoes, it's healthy...

Grilled Green Tomatoes with Corn and Pepper Salsa
Slightly modified from Shape magazine's recipe
Serves 4
Prep time: 15 mins; Cook time: 4-5 mins

Ingredients:
2 T extra-virgin olive oil
8 slices firm (unripe) green tomatoes, about 1/3 inch thick each
1 T dried Italian seasoning
2 cloves garlic, minced
Salt and pepper to taste
2 ears sweet corn, kernels cut off
1/4 red pepper, finely chopped
1/4 green pepper, finely chopped
2 T finely chopped red onion
2 T finely chopped cilantro
1 T rice-wine vinegar
1 t ground cumin
1/2 t chili powder

Directions:
1. In a medium bowl, mix olive oil, Italian seasoning and garlic.    Add tomato slices, rubbing marinade in.  Season with salt and pepper. Let sit for 15 minutes.

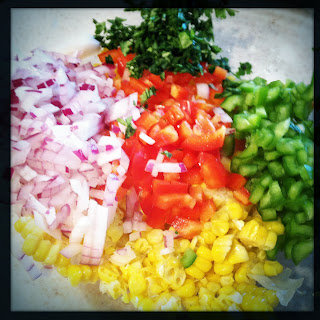
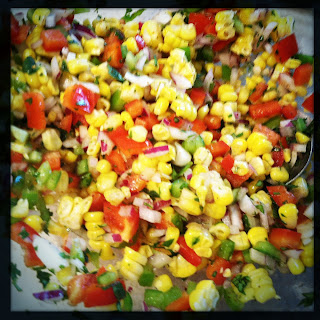
2. Combine remaining ingredients in another medium bowl.


3. Heat grill.  Cook marinated tomatoes 2 minutes or more on each side, until lightly browned.


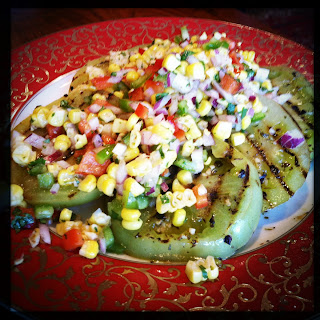
4. Arrange grilled tomatoes on a platter and top with corn salsa.


Not only did I make this recipe according to plan, but I took it a step further and stacked two of the grilled green tomatoes with two red (ungrilled) tomatoes and 2 slices of fresh mozzarella:


Pretty stack!

And it was gooooood.  Very good.

Click here to view/print the recipe!

Friday, July 27, 2012

Florida Key Lime Pie with Chocolate Crust

I love Key Lime Pie.  It's one of my favorite things in life.  Whenever it's on the menu, I order it.  If there is a Key Lime Pie martini, I drink it.  And with every bite or sip, I sit back and savor the tart flavors, and end up have a "When Harry met Sally" orgasm-like moment.

But I've never tried to make Key Lime Pie... and I don't know why.  Maybe I was subconsciously intimidated by the idea, envisioning it would be very complicated?  Or maybe it's just that I didn't have a recipe...

So imagine my delight when, in the January 2012 issue of Food & Wine magazine, I found a recipe... and it was from a 19 year old blogger.  A friggin 19 year old blogger made a friggin Key Lime Pie, and here I am, at the (ripe old) age of 30, and I hadn't attempted it because I'm scared?  Pe-shaw!! (not sure how to spell that, but I think you get my drift)

 Florida Key Lime Pie


I originally wanted this to be part of my first "30 before I turn 30" challenge, but I ran out of time... so it seems fitting that it will kick off #18 Cook 30 more new recipes.

Without further ado... my very first Key Lime Pie, as adapted from Elissa Bernstein's recipe as published in Food & Wine magazine.


Key Lime Pie with Chocolate Crust
Difficulty: Easy!!!!
Makes One 10-inch pie

Ingredients:

For the crust:
6 Tablespoons unsalted butter, melted
1 cup chocolate graham cracker crumbs (from 9 whole crackers)
1/3 cup sugar

For the filling:
2 large eggs at room temperature
1 1/4 cups fresh lime juice (from ~25 key limes, or if you have to, ~8-10 regular limes)
2 Tablespoons sugar (ONLY IF YOU USE LIMES instead of KEY LIMES)
1 teaspoon finely grated lime zest
Two 14oz cans sweetened condensed milk

For the garnish:
Whipped cream for topping
Lime slices, thinly sliced, for garnish

Directions:
1. Make the crust.  Preheat oven to 375 degrees and grease a 10-inch glass pie plate.  In a food processor, pulse the graham cracker crumbs until a finely ground, then add sugar and pulse to blend thoroughly.  Add the melted butter and pulse until the crumbs are moistened.  Press the crumbs evenly over the bottom and up the side of the pie plate to form the crust.  Bake for 20 minutes.  Let the crust cool to room temperature.

2. Make the filling.  Juice the limes.  In a mixing bowl, lightly beat the eggs.  Whisk in the lime juice, lime zest, and condensed milk until smooth.  Pour the filling into the cooled crust and bake for about 20 minutes, until set around the edge and slightly jiggly in the center.  Let cool to room temperature, then refrigerate until very firm, at least 6 hours or overnight.

3. Get ready to serve. Take whipped cream, add to pie.  Garnish with lime slices.

4. Devour like a greedy goddess. Taste. Savor. Enjoy. Watch this clip and imitate (optional) ;)

Notes/Disclaimers:
  • While you can buy a store-bought crust to save time (and the amount of dirty dishes that pile up)... I don't prefer it.  Making the crust was pretty easy... and it was SO delicious... so just do it, mkay?
  • Speaking of the crust, Elissa's recipe calls for 1/2 cup finely ground almonds.  Oops.  See, my roommate and I always buy ingredients, use a teaspoon of it, and then the rest sit around in our cabinets and/or fridge for yeeeeears... so when I was shopping for ingredients, I assumed we had almonds somewhere.  And I'm sure we do, I just couldn't find them... so if you want, follow the original recipe and add almonds.  (Update: I found the almonds that I had forgotten I bought.  They were hiding behind a bottle of Bacardi.  Ha.)
  • Key limes versus limes.  There's a whole big controversy over this one.  Enthusiasts will tell you that you can't beat key limes, and that it's not a key lime pie if you don't have key limes.  I would have preferred to use key limes (mainly because it is a Key Lime Pie after all), but my grocery store didn't have key limes.  So, I went with limes, and I added just a teensy bit of sugar to help sweeten it up since limes are more tart than key limes.  My pie tasted friggin delicious anyway, but next time I'm going to keep an eye out for key limes so I can make this the proper way!
  • Whipped cream.  I'm not a big fan of whipped cream.  The original recipe calls for making your own.  That sounds great in theory, but I just bought one of those cans of whipped cream, and that's what I used.  But only because I'm taking this pie to a BBQ pool party.  If I was going to keep it all to my greedy self, I'd nix the whipped cream (and the crust, for that matter), and just spoon the delicious filling in to my mouth while sitting in a jacuzzi and having a hot cabana boy massage my back.  Wait.  Crossing fantasies, sorry...

SO THERE YOU HAVE IT.  My first Key Lime Pie.  Despite having some issues with covering it with plastic wrap (which took a few precious bits of filling off the pie and left it looking un-smooth), this was super easy to make.  Easy as pie, so they say :)

 Florida Key Lime Pie