Wednesday, November 4, 2015

Sage burgers with apple-onion-baslamic slaw (paleo)

Mmmm.... burgers!!!

Burgers are delicious.  Every now and then, I crave a good burger, but I often dislike restaurant burgers because they serve you a 12 oz burger with a huge bun that's been buttered with tons of mayo, which is super unhealthy (my arteries hurt when I'm eating it...)

So this burger?  It's savory with a sweet slaw.  It has all the Fall flavors that you get to enjoy NOW! Bonus: it's healthier than your standard restaurant options!

So don't delay, make these Sage burgers with apple-onion-baslamic slaw today!  Click here for the recipe.


Here's how I made it!

1. Add diced bacon into a pan and let it cook.  Remove from pan.
2. Add onion to same pan, and cook it in the bacon grease/oils until translucent.

3. Next add your apple and mix with onion and cover to let cook for 4-5 minutes. Then add your balsamic vinegar and water and a bit of salt and thoroughly mix together until the balsamic vinegar is completely incorporated in.

4. While your chutney is finishing cooking, mix your burger ingredients together in a bowl.


5. Make 4 burger patties and place burgers in a skillet under medium heat with 1-2 tablespoons of your choice of fat.  Cook on both sides for about 5-8 minutes or until cooked to preference.

6. Place chutney on top of burgers and consume!!

Enjoy!!!  Click here for the printable recipe.

Sage burgers with apple-onion-basalmic slaw
Recipe slightly adapted from PaleOMG

For the burgers
  • 1lb Ground Bison
  • 2 tablespoon fresh sage, chopped
  • 1 teaspoon garlic powder
  • 1 teaspoon onion powder
  • salt and pepper, to taste
  • 1-2 tablespoons choice of fat (I used bacon fat)
For the chutney
  • 5-6 slices bacon, diced
  • 1 red onion, diced
  • 1 apple, cored and diced
  • 2 tablespoons balsamic vinegar
  • 2 tablespoons water
  • pinch of salt
Instructions
  1. Place large skillet under medium heat and add diced bacon. Cook down until bacon is completely cooked through, then place cooked bacon on a plate with a paper towel and leave 2-3 tablespoons of bacon fat in the pan.
  2. Then add your diced onion to the hot pan and cook down until translucent.
  3. Next add your apple and mix with onion and cover to let cook for 4-5 minutes.
  4. Then add your balsamic vinegar and water and a bit of salt and thoroughly mix together until the balsamic vinegar is completely incorporated in.
  5. While your chutney is finishing cooking, mix your burger ingredients together in a bowl.
  6. Make 4 burger patties and place burgers in a skillet under medium heat with 1-2 tablespoons of your choice of fat.
  7. Cook on both sides for about 5-8 minutes or until cooked to preference.
  8. Place chutney on top of burgers and consume!!

Thursday, July 2, 2015

Giada's Spicy Red Wine Spaghetti

I love wine.  Like, REALLY love.  As in, can I get married to it?  A good bottle of wine never lets you down... it's a way to celebrate good times, and enjoy your food that much more by highlighting flavors and cleansing the palate.

And you hear of people adding 1/2 a cup of wine to deglaze a pan or to add flavor to this or that sauce, but using an entire bottle of wine in your dish?  Never would I ever have thought of it.

So thank you, Giada de Laurentis, for introducing me to your magical Spicy Red Wine Spaghetti... I don't think I'll ever be the same... so much flavor... creaminess... richness... freshness... and a bold purple color! Outstanding.


Here's how I made it...

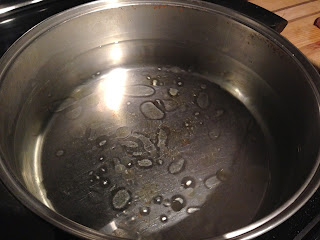
Start by boiling water in a large pot.  Add olive oil and salt...


...open up a beautiful bottle of cabernet... I went with Apothic Red, which is one of my favs...


...once water starts to boil, add spaghetti and cook for a few minutes (you want to remove spaghetti about 4-6 minutes before the full cooking time as per the instructions on the box...)


...once half-done cooking, remove pasta from water and drain, setting aside....


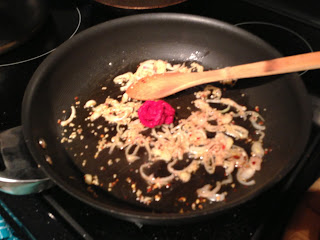
...meanwhile, saute some garlic, shallots and crushed red peppers....


...once the shallots/garlic are done cooking, add 1 T tomato paste...


...and then add the entire bottle of red wine, stirring until the tomato paste is dissolved...


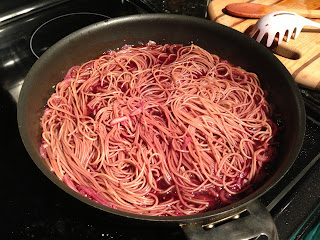
...move the half cooked pasta to the red wine mix, tossing to combine...


...continue tossing regularly so the pasta soaks up the red wine...


...meanwhile, chop some fresh parsley...


...and when the red wine sauce is almost gone, add 1 T butter and stir until melted...


...after butter is melted and red wine sauce is all cooked down, add crumbled goat cheese and parsley, and stir to mix...


...and then plate...


...don't forget to breathe in the amazing aroma before digging in...


Mmm.  Mmm.  Mmm.  That's all I can say about that.

Try it yourself - here's the full recipe!

Giada's Spicy Red-wine Spaghetti
Recipe courtesy of Giada de Laurentis

Ingredients
Kosher salt
1 pound spaghetti
1/4 cup extra-virgin olive oil
3 large cloves garlic, chopped
1 large shallot, halved, thinly sliced into strips
1/2 teaspoon dried crushed red pepper
One 750ml bottle zinfandel
1 tablespoon tomato paste
1 tablespoon butter
1/4 cup fresh flat-leaf parsley leaves, chopped
4 ounces coarsely crumbled goat cheese

Directions
1. Bring a large pot of salted water to the boil. Add olive oil, and cook pasta for 6 minutes, stirring pasta occasionally, until par-cooked. Drain and reserve the pasta water.
2. In a 12-inch nonstick skillet, heat the olive oil over medium-high heat. Add the garlic, shallots, crushed red pepper flakes and 1 teaspoon salt. Cook until the garlic becomes fragrant, 1 to 2 minutes.
3. Add the wine and tomato paste. Bring to a simmer over medium-high heat. Reduce the heat to medium and simmer gently for 3 minutes.
4. Add the pasta to the skillet. Cook, stirring frequently, until almost all of the wine is absorbed and the pasta is tender but still firm to the bite, about 5 minutes (if the pasta mixture is too dry, add pasta cooking water 1/4 cup at a time).
5. Stir in the butter and 1 teaspoon salt. Increase the heat, and toss until the wine sauce thickens enough to coat the pasta, about 1 minute. Toss to blend.
6. Add the parsley and goat cheese and serve. 
7. DEVOUR.

Monday, April 27, 2015

Honey and Fruit Chicken Salad (Paleo)

In Florida, Publix is a staple.  They've expanded, but for Floridians, you go to Publix.

And every now and then, when I go to Publix, I indulge in some of their pre-made food.  They have a Honey, Fruit and Almond Chicken Salad, and it is just so good, I can devour it in one sitting. So I'm always trying to recreate it, and while I'm not perfect, here's a good attempt.  If you try this recipe out, what edits would you make??  Let's collaborate!


But first, here's how I made it:

1. Take several dried apricots, dried cranberries, and slivered almonds...


...and chop them up into smaller pieces...


2. Next, take cooked chicken and shred it.  Add to bowl with the chopped fruit and nuts.  Add mayonnaise, salt/pepper to taste, and 1 TBSP of honey....

3. Mix it together so all is well incorporated... and just try not to eat it all in one sitting.  I dare you.


Looking at the nutritional information found here, the only ingredients I am missing are walnuts, lemon juice, and celery.  I think I'll try perfecting it for next time!  If you try it, let me know how it turns out!  Cheers.

Sunday, March 15, 2015

Iceland (Part 2)

This is the second part of my description of traveling to Iceland!


As you know from Part One of my trip to Iceland, the main reason I decided to make a visit was because I wanted to see the Northern Lights with my own eyes.

When I was researching Reykjavik, I learned that you could do sight seeing cruises to try and see the Northern Lights, but that it was harder to see because Reykjavik was located in the South. The recommendation was to travel as far North as you could to have a better chance at seeing them.  (side note: I met another group of individuals who went on the cruise out of Reykjavik and saw the Northern Lights just fine).

So as part of my trip, I visited a town called Akureyri, which is in Northern Iceland. I flew over the middle of Iceland, and was able to observe the interior – which is pretty much all ice.

 
I spent two days in Akureyri, and really enjoyed the quiet, small town atmosphere. There are about 18,000 individuals living in Akureyri. I was able to walk around town, check out an art exhibit, and eat a great local meal.


I splurged on a private jeep tour, and I got to see so much of the country, and experienced a lot of waterfalls, springs, lakes, and a lot of ice and snow.

A few of the highlights:

1. Godafoss waterfall, or “the waterfall of the Gods.” Legend has it that this is the waterfall where the King dumped his pagan gods after Christianity was formally embraced in 1000 AC.  


2. Mavtan, which was not as easy to appreciate because of all the snow, but was a lava field and craters and beautiful lake;


3. Dettifoss, which required a 24km trip down a snow covered road, getting stuck twice. This waterfall is apparently the most powerful in Europe.  


We had to hike a significant way (a mile or two) through snowy, rocky terrain to reach Dettifoss.  The journey looked a lot like this - a world of complete white.


4. Lunch at an incredible local café, where the cows were chilling inside the restaurant (but in a separate room). 


5. And a few other stops at a mud bath, several small places that were unmarked and you would never know about as a tourist.  Such as this random hot spring/geyser where I was able to warm my hands (slightly!)

 
6. And our final stop (I was sooo tired I ended up taking a nap in the Jeep on the way home!) was to check out the "old houses", which are wood frame houses in front, with mud and brick construction on the other three sides:


One of the “quirks” I noticed about Akureyri were the stop lights.  The red light was not a circle, but instead a heart.  The town did it for a holiday, but the towns people loved it so much they asked to keep it…


And then for the moment I’ve been waiting for, the moment that inspired my whole journey.  Time to see the Northern Lights. 

A bunch of tourists and I congregated in the hotel lobby, waiting to board the buses and begin our tour. I chatted with a few who were on Day 2 of attempting to see the Lights, as on Day 1 it was cloudy and they could not see anything. This made me nervous, as it was also cloudy that night. But we got lucky!  We boarded our tour bus, and drove for about 45 minutes outside of the city of Akuryeri, and the skies cleared.

We pulled off to the side of the road, got off the bus, and were plunged into total darkness. Around 11pm, we finally started to see the Aurora Borealis. I did not see what I expected to see. I expected an explosion of colors, like the ones you see on time-lapse videos. Instead, I saw a white ribbon, like it could be smoke or a thin cloud. But I stood there, in freezing temperatures for over 45 minutes, staring at what someone told me was the Aurora Borealis.

Right around midnight, this thin, ribbon-like whisp of white started to shimmer a bit, and I could start to see brief glimpses of a light green glow.  Back on the bus, I was looking at pictures from professional cameras and I was stunned at how beautiful it was- the green glow, the mountains in the background and to our right. I learned then that your naked eye can’t see the lights, but cameras are able to capture the colors.

Me, watching the Northern Lights. This was the only photo I was able to take that turned out well enough. My camera was not sophisticated enough to capture it!
Luckily I befriended a nice family from Colorado, and they sent me pictures they took:


I was so excited and frozen after what I had seen.... I have to confess, I wasn’t as “awe-inspired” as I thought I would be, as my expectations were different than what actually happened. But once I realized what was happening, I was able to see great beauty, and pay more attention.  It's amazing, you wonder how easy it is for people to not see the beauty in something because they are looking too hard or have different expectations...

Bottom line, I accomplished what I came here for... I saw the northern lights!  And now I need to invest in a professional camera and take lessons in how to use it...

Stay Tuned for Part 3!

Friday, February 27, 2015

Mushroom and Thyme Frittata

I don't know about y'all, but I love eggs.  Eggs are perfect for breakfast.  I can have my two eggs (plus some veggies and avocado), and I am fueled until lunch time.

I'm always looking for ways to incorporate veggies into all my meals, including breakfast.  And as a savory person, I love hearty and beefy mushrooms.  So let me introduce you to the incredible, amazing Hearty Savory Mushroom Fritatta!


It may be hearty, but it is heavenly, light, and yet oh-so-savory that it is great for both breakfast OR dinner!

Here's how I made it:

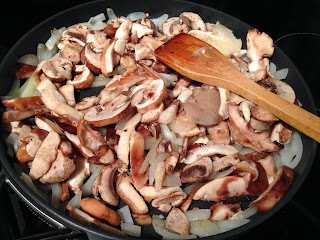
1. Heat oil in a large pan.  Add 1 cup sliced white onion, and sautee until slightly transparent.  Next add sliced mushrooms (I used both 8oz of baby bellas sliced and 1 package/8oz of exotic mushroom blend).  You can chop into small bits, or leave in big chunks like I did.


2. Season with salt and pepper. Cook onion and mushroom mixture for 10-15 minutes until mushrooms begin to brown and start to shrink.  Add chopped fresh thyme.


3. Stir to incorporate, cooking some more.


4. Transfer onion mixture to a lightly greased glass pie plate.

5. Whisk 2 eggs, 4 egg whites, 1 TBSP of Greek yogurt, and 1 TBSP of water together.  Feel free to add garlic powder.  Once eggs are whisked and starting to get foamy, pour over the mushroom mixture.  Cook for 15-20 minutes on 350, or until sides of frittata start to pull away from edge of glass pie plate and slightly browned on top (see below!)


6. Slice into 4 wedges. You can dollop a TBSP of greek yogurt on top, or just eat as quickly as possible, your choice.

Click here for the recipe!

Monday, February 2, 2015

Roasted grape bacon wrapped filet mignon (Paleo)

Holy amazeballs.

I previously introduced you to my girl crush, Juli Bauer, in my post about Mexican-inspired burgers.  Let me go there yet again and introduce you to the wondrousness that is her Roasted grape bacon wrapped filet mignon. Trust me, you WILL thank me later.


Amazing.

That's all I have to say about that.

Here's how I made it...

Take a giant bunch of red grapes.  Remove from stem. Place in oven-proof bowl and add 1 T coconut oil plus some balsamic vinegar, toss to coat, add to pre-heated oven.

Take a slice of turkey bacon, wrap around outside of filet mignon, pin with toothpicks...


...when your grapes have about 10 minutes left of roasting, start cooking the steaks by cooking the bacon-sides first...


...and then grill the steaks 3-5 minutes per side...


 ...remove grapes from oven...


...and top cooked filet with the roasted grapes.... and DEVOUR.


Yes.  It was THAT. EASY.

And you know what's funny/horrible?  I'm learning about the Modern Portfolio Theory (bear with me...) and the Capital Asset Pricing Model, which are two investment theories which basically both say that you should invest in the optimal portfolio that maximizes the return while minimizing the risk you take. 

And this dish?  Completely maximizes the taste with barely any risk (i.e. work).  I want to eat the roasted grapes by themselves. For real y'all.

Continue reading for the recipe, or click here for a printable version.

Roasted grape bacon wrapped filet mignon
Recipe courtesy of PaleOMG!

Ingredients:
1.5 cups of grapes
1 T coconut oil
2-3 T balsamic vinegar
2-3 Filet mignon
2-3 strips of turkey bacon
toothpicks

Directions:
1. In an oven-safe dish, place the grapes, coconut oil and balsamic vinegar, toss to coat, and place in pre-heated oven at 400 degrees for 20 minutes or so
2. When there are ten minutes left on the grapes, wrap bacon around the filet mignon, use toothpicks to anchor
3. Heat a skillet and some more coconut oil, and start grilling the steaks, bacon side first, and then grill each side 3-5 minutes each.
4. Remove grapes from oven, remove steaks from grill, top steaks with roasted grape deliciousness.
5. Try your best not to inhale these without tasting the fabulous flavors, mkay?

Roasted grapes.  Who would have thought.  I wonder what roasted strawberries... raspberries... and other fruit will taste like?!?!